But they can't keep up. They started in 1987 and have sort of given up the fight. The stuff grows FAST. The hydrilla does have benefits; the fish like it and it is good for water quality, but it also has the downside of any invasive species.
Pages
- Home
- Introduction to Sail Delmarva
- Site Map
- Anti-Chafe Gear
- Marine Winterizing Primer
- Man-Overboard Recovery and Climbing Gear
- Holding Tank Odors vs. Carbon Vent Filters
- My Other Blog (Chesapeake Gunkholing and Kayaks)
- The Purpose of Work
- Diesel and Biocides
- Practical Sailor Magazine
- Good Old Boat Magazine
- The Bookstore
Thursday, September 19, 2019
Hydrilla Mower
But they can't keep up. They started in 1987 and have sort of given up the fight. The stuff grows FAST. The hydrilla does have benefits; the fish like it and it is good for water quality, but it also has the downside of any invasive species.
Sunday, September 8, 2019
UV Protection for Sails
A year ago I began researching the use of paint for UV protection on roller furling jibs.
I started with test panels on the roof. House paint samples failed right away, either chipping or pealing in strips. But special purpose paints, compounds either for sails or cloth, generally held up pretty well.
Last week my primary jib basically died, with multiple (4) tears through the Kevlar leach. The only thing that kept it from spliting right across was the Sunbrella cover and strong repairs just forward. The foot also developed multiple smaller tears the same day. It was breezy.
Thus, it was time to install my back-up jib, which has only a failed UV Dacron cover.
- Will the paint stay on? I painted it months ago, I've rolled it in and out a dozen times, and tacked dozens of times, though in moderate wind. So far, it looks and feels good.
Thursday, August 29, 2019
Local Bridge Decoration
July 1, 2019
It's an old railway bridge abutment along side a rails-to-trails path. Someone got busy with spray paint last week. I like it.And less than 2 months later is see some boring functionary had them paint over it. I'm sure he was pressured by some boring Vienna busybody.
What a shame. It made me smile every time I passed it. Silly and informal is nice.
Wednesday, August 28, 2019
Bealton Flying Circus
For those of you that are not into aviation, at all, the Stearman was the primary trainer for the Navy and Army Air Corp during WWII. These are not reproductions. These are museum quality aircraft that still fly an airshow every summer weekend.
After the show--which is a great entertainment for a summer afternoon--you can walk down the line from plane to plane. The pilots know the history and clearly treasure their birds.
If you are in the area, check it out. When you stop to realize these planes are all 80 years old, and that none are reproductions, you just have to be impressed.
What they suffer from is an atrocious lack of publicity.
The Bealton Flying Circus
Sunday, August 18, 2019
New Job Has Me Busier Than a One Armed Paper Hanger
But that doesn't mean I'm not doing sailing stuff. I expect things to settle down soon. Meanwhile...
Tuesday, July 2, 2019
A Few Boat Specific Notes for My Sailing Partners
The mounting plate is the aluminum strip at the bottom. It is attached to the two big clamps. The two angled slots are to clear the reverse lock.
I also replaced the fuel line assembly with the bulb. It has been getting stiff and not pumping up well.
The motor did die on me once, when I dialed up full throttle for a few minutes to check the mount. I noticed the bulb was sucked flat, suggesting the anti-siphon valve on the tank probably has some dirt in it. When I pumped it up the engine start with an easy pull and ran fine at moderate throttle. I'll take it apart soon.
I then upgraded the shroud tensioner to 8:1 from the previous 4:1. It should now be easy to tension the shrouds in strong winds without leaving the cockpit. They are also easier to release. It was line I had, perfect fit, no leftovers.
It is possible to over tension the rig now, if you get ham-handed. According to the manual, the max tension is about 1600 pounds, which means about 300 pounds on the tensioner. That means do NOT pull more than 300/8 = 37.5 pounds on the rope. A good one arm pull, but no more. It is very smooth.
In the photo you can see a black whipping ~ 5 inches from the cam cleat. This is the light wind setting. At a minimum, pull both adjusters to this position before sailing. This should cover you up to about 6-8 knots. As the wind increases, you need enough tension to keep the lee shroud from going slack and snatching tight; that is very bad for it. I will put two seizings close together at the maximum setting, but it was not windy enough to establish that value today. It's probably about another 9-12 inches up, but we'll see. For now, just enough to take the slack out.
And then I went kayaking. This is just south of the beach near Deale.
Monday, June 17, 2019
Painting a Sail
Rev. 7-25-2024
I used this painted sail for three years before replacing it for other reasons. The paint never pealed.
No comic book super heroes or advertising logos. Just the UV strip.
Our new-to-us laminate jib is starting to fail along the edge of the sun cover; the cover makes a stiff spot and the flexing is damaging. The cover was also too small and is itself, failing (UV Insignia cloth). If I tried to sew on a new cover the needles holes would destroy the sail, and it's too old to justify the expense and effort, really.
If the ONLY thing we want to due is block the sun, why not paint? For the past year I have had samples of many different paints, ranging from house paint to specialized sail paints on racks on the roof, weathering. Naturally enough, it is a writing project.
Although the roof top exposure tests are not complete, I selected MDR's Inflatable Boat Topcoating. It seemed to be among the top performers, I've used it on inflatables, it got a top rating from Practical Sailor some years ago, and I had enough left over. Free is always nice.
No, I don't expect it to last as long as a Sunbrella cover. Neither will the rest of the sail. But it also cost me only 15 minutes work and $15 worth of leftover paint.
Look for a detailed report and follow-up in Practical Sailor Magazine.
Saturday, June 1, 2019
Cruising Small, Cruising Fast
I started started sailing on a beach catamaran. I heartily recommend learning on a small boat, because they teach a sense of the wind and waves that is hard to gain on larger boats. But if you want to go farther or spend the night, you really need something with a bunk. But you don't need 50 feet of shiny fiberglass and the mortgage and slip fees that go with it. That's what they sell in the mags because that's where the (your) money is.
And to be honest, big boats aren't that much fun to sail, not after you get the hang of it. They're more about learning the systems and planning than actually sailing. Would you you rather go for a bike ride or drive a Winnebago around town? Personally, I'd take the bike, and that is why I downsized from a cruising cat to a 24-foot trimaran; the smaller boat sails better and I feel the wind again. I missed that on the cruising cat.
The thought that brought fire to my pen is that too many sailors feel that sporty boats are for racing. Poppycock. They are for whatever is fun, and if you only take the plunge, you'll see that fast cruising is a blast, though it can be a bit more like camping that staying in a hotel. Of course you can do both; sail fast from point A to point B, and then stay in a motel.
And that is the sort of thinking that goes into cruising fast and small. Ignore the magazines and make it work. You've never had so much fun!
Friday, May 31, 2019
Shroud Tensioner
rev. 7-25-2024
This probably won't interest most readers, but a fellow F-24 owner wanted some images.
Because the F-24 folds, a quick release of cap shroud tension is required. Pulling the shrouds aft with a tackle is a simple way. This can either be a cascade:
I have since re-rigged this as 8:1 and the tail slack is pulled under the tramp with a bungee (out from under foot and can't wash off the deck). The only reason to rig it 4:1 is so a gorilla can't over tension at the dock. With 8:1 you can tension under full sailing load and get it right.
Tuesday, May 28, 2019
The Best Rope-to Chain Splice
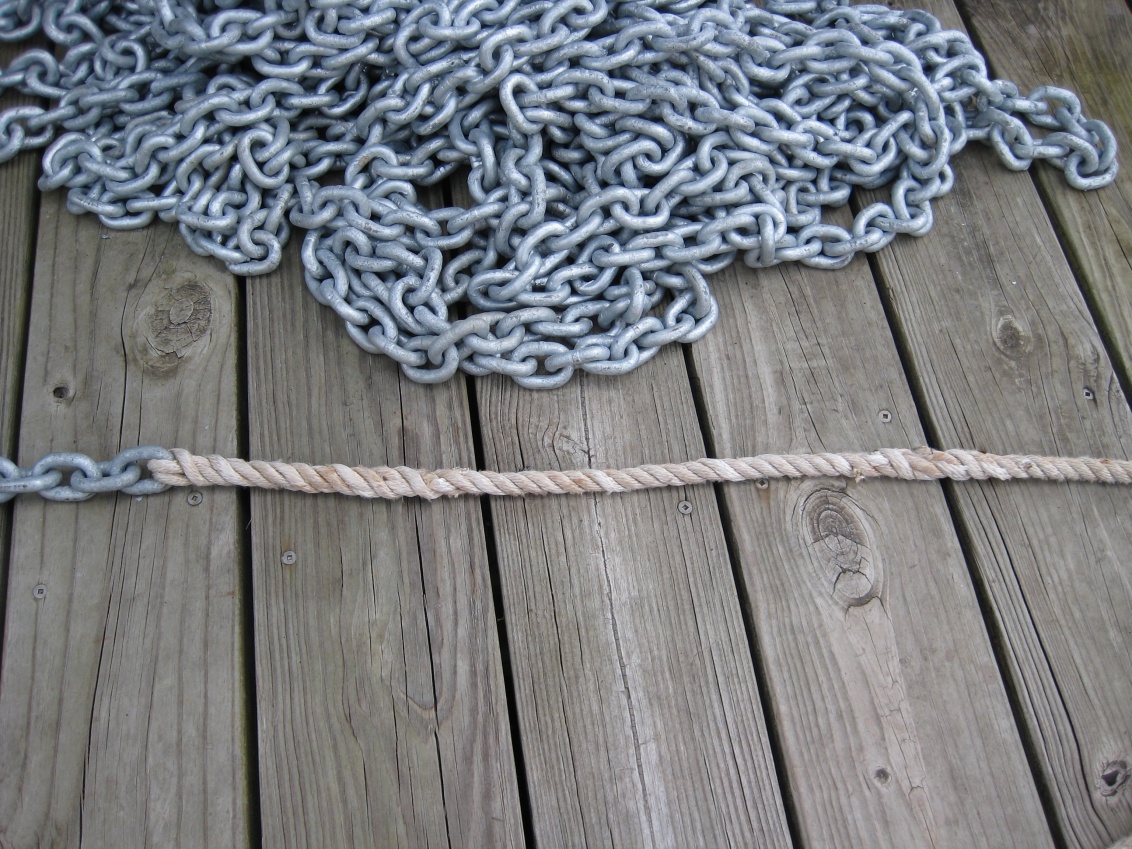
Joining chain to rope in a manner that allows it to feed smoothly has always been something of a challenge. Back in the day of weak chain and hemp rope, a 2-strand splice was developed to allow bulky rope to fit through a link. One strand was unlaid way back and the remaining strands go through the link in opposite directions, laying flat and sharing the load evenly. Even with the loss in strength around the link, 4 strands were as strong as the 3 strands of the rope. One of the strands would be laid back in the empty groove and terminated in the manner of a long splice, and the other back tucked like a 3-strand eye splice.
Then ropes got smaller and stronger, and a simple 3-strand back splice or crown splice became the standard. The smaller line was as strong as BBB chain. Then we introduced G43 and G70 high tensile chain. By the time we use a rope as strong as the chain, the splice was too big for the windlass gypsy, and so the irony is we find ourselves returning to 19th century splicing technology.
It is a little more difficult to get the strains even, and the spice takes a few minutes longer, but you gonna love the way your windlass feeds. No more jams!
The name "irony splice" was coined by Brian Toss, and this method is well described in his highly-recommended book, The Rigger's Apprentice. It takes considerable practice to get the tension just right, but if you have any ability with splices, by the third or fourth try you should be in good shape.
The following instructions are for half-inch three strand rope. For larger diameters, increase the spacings proportionately.
- Place a light seizing around the rope about 5 feet from the end.
- Tape each strand separately and securely.
- Unlay one strand back to the seizing, without disturbing the other two strands.
- Place a light seizing across the two remaining strands about 3 feet from the end.
- Untwist the two strands and lead them through the last link of chain in opposite directions.
- Take one of the strands and lay it into the space left vacant by the first strand that was unlaid. Be careful to maintain twist in that strand, and to choose the strand most naturally lies in that vacant space.
- When this strand meets the first seizing and the first strand that was unlaid, join the two strands in the manner of a long splice. This will require a locking overhand knot, back tucking both strands, and tapering.
- Take the remaining loose strand, still hanging loose at the last link of chain, and tuck it back at least eight times in the manner of a back splice. Taper carefully.