Sunday, December 27, 2015

Ditch the Bent Nail

I've been doing a series of tests on backing plate materials, drilling, de-coring, dpoxy filling, and re-drilling innumerable holes in balsa cored laminate. The standard method is to use a bent nail to pulverized the balsa.

Bent nail

Well, ditch that. At the suggestion of another DIY sailor I tired a notched roofing nail.
  • The drill bucks less. Particularly helpful on larger holes.
  • The dust is finer and hence easier to remove. No need to dig it out with a nail.
  • You are less likely to miss a spot, though as the pictures show, both methods can do a very nice job.
Notched roofing nail

Dremel cutters work, producing fine dust that is easier to remove, but the undercut is only 0.09-inch vs 0.19-inch for the bent nail or roofing nail. By the time you cut a bevel for sealant, there isn't much left for a seal.

---------

The right tool for the job bay be the notched roofing nail

Wednesday, December 23, 2015

Mazda Makes a Key so Fragile You Can't Put it In Your Pocket

That's what the warranty managers said; "carrying the key in your pocket, even a front pocket, is classified as owner abuse." All it takes is a little pinching action when you lean forward to lever the key apart. Note also that it looks as though the metal continues from the loop into the blade, but in fact they are separate parts, joined only by thin plastic. In the day of electronic keys, that is a $345 break, according to the dealer.

Somehow, he told me that without shame. I guess it takes a special breed of man to work at Tyson's Mazda.


I enjoyed good luck with Subaru and a dealer network that would repair things that were not warranty if they agreed it was a design problem. The Imprenza is looking pretty good about now.

Can't carry a key in your pocket? I need a man-purse (there is no such thing) now? That's just plain pitiful.

Thursday, December 17, 2015

Keep Your Arms Down

Crotch straps on harnesses and PFDs are all the rage with the safety set. Yes, you can always worm out of the chest-only harness. On the other hand...
  • They are bloody uncomfortable and falling will be bad.
  • Horse collars have been used for lifting for years.
  • Rock climbers used chest harnesses in years gone by; although there were injuries, falling out of the harness was not the problem.
Why did they work for climbers and continue to work for rescue? Because they keep their elbows down! Why do they not work so well for sailors? Because stupid, panicked people reach for the rope, which is the very last thing you should reach for. The higher you reach, the more your shoulders move together, allowing you to slide out--a perfect case of instinct over ruling the most basic common sense. Wearing a harness to loose (for comfort) over foul weather gear only makes the situation worse. It works for climbers because they are trained never to reach for the rope when falling and they fit the harness correctly. It works in rescue because the swimmer controls the situation: notice how the rescue swimmer holds the mans arms down.  Additionally, the survivor is always instructed not to help in entering the helicopter. while there are many reason, the primary is that the survivor can easily raise his arms to help, without thinking, and fall out.


Reading instructions also helps: notice the arm position.


So if you know you are going over the side, or if you are being collected by Lifesling or horse collar, keep you elbows down!

Preventers--The Traveller Taken to its Logical Conclusion?

Catamarans, with their full-beam travelers, present a different case from monohulls.
  • Through much (not all) of the range of motion, they provide positive control over the boom-end position.
  • Assuming the controls work from both ends, they function as a preventer if the sheet is tight (the traveller is locked down). Many catamaran feel they do not need one for this reason; a full jibe is impossible. But if running very deep it is still required to hold the boom down and prevent little mini-jibes, where the traveller does not move but the boom still slams a good distance when the wind gets behind it.
  • Av vang is not desired because it reduces the speed with which the sail can be unloaded in a gust (both the main sheet and the vang must be let go--not acceptable).
  • A catamaran can be capsized, not just knocked down, if the main is pinned on the wrong side in enough wind. I've never hear of this happening on a cruising cat, but I've experienced it on beach cats with the traveler jammed.
Yet often we see preventers that require crew to go forward to release.

The ideal preventer, then, does the following
  • Holds the boom down and forward when the sail is well eased going deep. In this function it acts as an extended traveler, providing height control, since most cats do not have vangs. Thus it must be no further forward than the main beam and it must be tensioned by a cockpit winch, in order to be adjustable.
  • It must be quickly releasable in a controlled manner. If the main is caught aback in a squall, the crew must be able to let it across and then dump the main in seconds.
This is quite simple. I run a line from the boom-end to the mid-ships cleat and back to a winch. Farther forward will not hold the boom down. This does mean that one of the sails must be in a jammer (either the main sheet or preventer), but I can through a turn over a winch and ease it quickly if I need to.

Sorry, no pictures yet.

Tuesday, December 15, 2015

Jacklines--A Centerline Aproach for Monohulls

Where to run the lines is always controversial. Along the side deck is traditional, but that leads the sailor right along the precipice, troublesome on the windward side and scary on the leeward side.  I run mine over the hard top and on the edge of the cabin. These sailors take it further, running the lines near the center. Yup, you are forced to re-clip near the mast, but the result is good protection on a narrow bow.

I'm not sure it's for me, though. I don't think people actually fall off to windward.

Jackline "Frost", an Amel Maramu

Thursday, December 10, 2015

Laura Would Hit Me


Looks pretty stable, though.

Wednesday, December 9, 2015

Remember this Guy....?


A few weeks after I spotted that beauty, the boat came loose. Big surprise. Some one re-tide the boat with a proper hitch.

I spoke with him today, as he was winterizing his boat. He had learned his lesson and changed to a more secure knot. I'm not joking, I swear.


I what can you say?

On the other hand, I saw these 2 beauties just 3 boats down. Somehow, he started both hitches from the wrong end of the line.


Glad I'm at the other end of the dock.


Thursday, November 19, 2015

Window Garden...

... or What Happens if You Ignore the Pantry for Long Enough

Actually, my daughter made me promise to leave this just as it was, after a summer trip, to see what would happen. In a few more weeks I'll have a nice winter crop of spring onions.


Thursday, November 12, 2015

Black Diamond Torque Mixed Climbing Gloves--Disposable World Cup Stuff?

According to the Black Diamond web site:

Torque Gloves
A durable, slim-fitting glove with a super-sticky palm ideal for drytooling and mixed cragging, the Torque’s lightweight construction provides incredible sensitivity without palm rolling.


Description
Built for high-end mixed climbing and drytooling, the Black Diamond Torque Glove features a super-sticky palm and low-profile construction for unmatched grip and dexterity. The softshell fabric protects your hands from the elements while remaining highly breathable, and the soft tricot lining adds just enough warmth for the WI5 hanger above the business.


  • Abrasion-resistant woven softshell
  • Slip-Stop palm for unparalleled grip
  • Laminated, brushed tricot lining
  • Articulated neoprene cuff with hook-and-loop closure and carabiner clip loop
  • Compression-molded EVA padding for impact protection

 I can agree with the sensitivity, fit, and sticky palm comments. They are a pleasure to slip in and out of leashes. But the durable adjective is provably misplaced.

After two 30-foot M6 climbs and one 30 lower, the rubber was gone from the right pinky and holidays were evident on the ring finger. Just one short lower.

I called Mountain Tools and they sand "but you've used them." Black Diamond said "they aren't for rappelling, just climbing." However, the company literature does not SAY they are too delicate for any of the realities of climbing.

The next day I went to the same places, climbed 3 times as much and lowered 3 times as much, wearing a pair of 10-for-$3.99 disposable work gloves ($0.39 each, or about 140 times cheaper) and had less wear. Pretty comfortable, too. Perhaps the Torques climbed a little better, but only a little. I may have to start keeping a stack of the discount gloves in my pack. I can loose a lot of them for 39 cents.

Saturday, November 7, 2015

Jack Lines

To sailors, jacklines (one word) are safety lines running down either side of the deck. We clip to these with tether lines to prevent falling overboard. However, to the lubber--fact the broader meaning of the term--"jack" describes something of utility value, odd jobs, or regular. In old English it could refer to one of the peasantry, a common seaman, or anything common; jack stays, jack of all trades, regular jack, lazy jacks, jack s__t.... 

Jack line (two words), from Websters Dictionary:

jack line, noun.

1:  a small rope or line
2:  a rod or steel cable connecting a central pumping engine with each of two or more oil wells which it powers 
 I keep 2 of these utility (Websters definition 1) jack lines in the cockpit pockets at all times. They are about 30' x 3/8" with a wire gate climbing carabiner on the end, and serve many purposes, both routine and contingency.
     
  • Jibe Preventer. Clipped to the boom-end mainsheet bail, led forward under the midships cleat, and back to a winch, it creates an adjustable preventer that can be instantly released. 
  • Boom Downhaul. Because of the beam of catamaran, the mid-ships cleat is sufficiently far forward for a preventer. From this location it also pulls the boom down, making for a useful vang substitute when the traveler is all the way out and the mainsheet is eased.
  • Twing line. When broad reaching it is often advantageous to haul the spinnaker or genoa sheet down.
  • Clearing overrides. Place an accender (also kept in a cockpit pocket) to the sheet, clip the jackline to the ascender, and lead to a spare winch. faster than a gripping hitch and good up to about 1500 pounds.
  • Recovering fouled anchor. If the anchor is fouled on drift wood or trash, often getting it clear is as simple as hanging the anchor upside down. Raise the anchor as far as possible with the windlass, clip the roll bar and secure to a bow cleat, and slack the chain. the junk should slide off. 
  • Jury rigs. Not to long ago one of the sling hold the dingy parted while under spinnaker (had been lazy and had not triced up the dingy, a mistake I will not make again). To get the dingy out of the water fast I simply clipped the lifting eye on the dingy, pass the jackline through the eyes on the davits, and took the jackline to a winch. The dingy was up in less than a minute. I immediately triced it up!

Spinnaker sheets can also be used this way in many cases, having the advantage of being pre-rigged through a turning block to a winch. Of course, if the chute is up that's not much of an option. But there are applications:
  • MOB (man overboard) recovery. Throw the Lifesling to the swimmer and pull him near the boat. Clip the spinnaker sheet to the Lifesling, up to a snatch block on the boom bail (we keep rescue blocks in the cockpit pockets), and winch away.
  • Anchor recovery. Unlike the jack lines, these are long enough to reach the bottom and back to a winch. Lead the line over the roller, clip either the roll bar or the tripping eye and winch.


Friday, October 30, 2015

Hiding Cleats

In the process of renovating the docks at a local marina (Herrington Harbor North, Deale, MD), someone had the briliant idea of moving the cleats to the underside of the dock. Not all of the residents (none of those I spoke with) think this was a good idea.


While I'm sure this de-clutters the dock, it also makes them hard to reach and more difficult to use properly. I don't get it. Style over function.

Wednesday, October 14, 2015

Euro Fender

As I began researching fender usage in difficult conditions for an up-coming article, I came across this unusual fender selection.


Hard to store, but it is keeping them off the bulkhead.

Monday, October 12, 2015

Mooring Knots: Update

Remember this?


Two weeks of light winds and a few direction changes transformed it to this...


 And this. I couldn't help but notice that the 3-strand line has been slightly re-tied, though not much better. There appears to be a unilateral lack of knowledge and cooperation.


Cost

I've noticed a spurt of budget-focused posts lately. Having been a victim of corporate consolidation few months ago I get it. While I could make a list of ways to spread money thin and a list of ways it disappears in big chunks, I find one thing helps more than all the others.

Know what you want to do. Going to the movies, shopping, or out to dinner is what happens when conversation slides to Jungle Book:

 "What do you want to do?"
"I dun know. What do you want to do?"
"'What do you want to do', 'I dun know, what do you want to do.' Well let's do something!"

When I actually know what I want to to do, costs go way down. I'm too busy doing it to notice the advertisements or all that is for sale in the world around me.

  1. Write a book or an article.
  2. Paddle wetlands or whitewater.
  3. Climb ice or rock. Travel can make this expensive, but local is free.
  4. Bicycle.
  5. Read a good book. I love libraries.
  6. Sail somewhere.
  7. Fix something. Though the part may cost something, more often it is still cheaper than entertainment, and something is accomplished, which will allow for guilt-free reading of that good book a little later.
  8. Research something. This probably circles back to one of the above. Very engrossing.
  9. Learn a new skill.
  10. Get a group together and do the thing that one of those people is interested... but not the movies.
But as a general rule, when I'm doing something or working on something, I'm not spending. When finished, I either kick back or get on with the next thing. But the moment you find yourself saying "I'm bored," you might as well pull out the checkbook, because the lazy answers come with a price tag.

Sunday, October 11, 2015

Bowsprit

(Note: I will be revising this as I get dimensions and finalize the design)

rev. 10-12-2015

("have" indicates I somehow have on in the might-need pile. it is a substantial and rich pile, scavenged from far and wide. It really helps keep my boat keeping cost down. My sources, of course, are top secret.)

After a day at the boat show and talking with designers, I've become convinced the real reason for a bowsprit on a cruising cat is not speed, it is to prevent hourglass tangles during jibes, the result of the forestay and spinnaker tack being too close together. My Stiletto tangled, my Prindle never tangled, but the PDQ will do it every time if the lines aren't handled just so. I could lower the squeezer, jibe, and rehoist, but that just isn't cool. And thus, a bowsprit is in order.

I'm not interested in a screacher; I have a 150% genoa that provide nice balance and is all she really needs or want up wind. This is only for a chute. Thus, I do not have to design for the huge tension loads a stay-set sail requires.

I cannot use the pole-type that Sandy (PDQ 36 Page 83) used; there is a gull striker in the way. I wouldn't want it over the tramp anyway.

Water stays. I can't secure them to low mounted u-bolts in the conventional manner; the starboard side the crash tank comes up at least 18 inches. Mounted that high, the compression load on the front beam would double, and I don't want to add a compression strut to the bridge deck. I could rig them like the Gunboat G4 and most beach cats:
  • Stays to the fore beam ends for lateral loads.
  • Extend the gullstriker downwards (dolphin striker) ~ 18" and run a stay from the tip of the pole, under this striker, to an anchor on the bottom of the bridge deck. This will take the vertical loads. However, the compression load on the front beam is doubled.
 So long as I can take the water stays near the water line, I'm not too concerned about the aft load on the fore beam for a chute. Some simple capsize calculations suggest that the maximum tack load might be about 450 pounds, though the usual load is less than 250 pounds even at double digit speeds (I can hand-tension the 2:1 bridle with reasonable effort by snapping it up so long as the wind is aft of the beam). The lateral load, whether carried by water stays or beam stays, results in only about 120 pounds of compression on the sprit. The vertical load is the concern, resulting in about 320 pounds of compression. Though I do not have detailed information on the forebeam, 440 pounds doesn't strike me as a lot on that span, far less than hard jumping on the tramp, which won't be happening if you are driving that hard.

Another way to think of this is to convert the force to horsepower. twin 9.9s can generate about 400 pounds of line pull (tested). If the tack tension is at 450 pounds (parallel to our direction--no drive), the sheet tension is generally about 500 pounds and the forward component of the halyard tension will be about 400 pounds, for a total of about 900 pounds of drive from the chute alone. Assuming about 1/2 that from the main and we have 1350 pounds of drive, or 67 horsepower. 3.3 times usual and enough to be driving in the low-teens. That would require over 25 knots going deep or 20 knots closer to the beam and is off my speed polar (I wouldn't drive nearly that hard as a hull start getting light--I've done that).

I will make the up-haul tackle internal, fed to one of the jammers.


So how to secure them low? I plan to use the same method I used on my Stiletto. I will take a stainless strap, like a chain plate, and wrap it around the bow at he height of the boot top, hiding it under the tape. It will be secured by about 8-10 self tapping screws in solid FRG, well bedded with polyurethane (Locktite PL S40 from Home Depot is a steal). Since all of the stress is in shear, they are safe and well suited to this application. I would go a few inches higher to reduce drag, but I want to hide it and I need to stay in the solid glass. The water stays themselves will be 3/16" Amsteel (have).

The spar itself may be a Hobie cat mast section (have), though that is overkill and I may switch to something smaller, If I find it. Smaller would save a few pounds, perhaps, but the larger diameter and thichness will make mounting the jammers easier.

There will be 2 internal lines; 2:1 tackline and 2:1 uphaul to the top of the gull striker (this supports only the sprit, about 8 pounds). These will be secured to jammers (have) on the sprit (I have these). I will put loop handles on the ropes to make hauling easier.

The tackline will exit through a Stiletto reacher halyard bock (have). The uphaul through a smaller block.
The slider is visible on the beam

The lines will be 8mm nylon (have). I reason the uphaul needs some stretch, since the water stays will not and any boats twists a little, moving through the waves. I don't want to create excess stress on the gull striker or forebeam by virtue of an unyielding rig. The spinnaker tack line will be polyester; stretch is not a concern--spinnakers need some give in lumpy conditions--the length is very short and it is 2:1 purchase.

The butt of the pole will rest on a track on the fore beam, allowing it to be moved to the side using a pin slider (have). This is NOT for adjusting the sprit, but rather to allow folding. I will likely not fold the sprit for years at a time, but they are commonly designed this way to allow for attaching and detaching furling screachers. Since I have the parts, it makes for a convenient mounting.

Not folded this way, but that is the idea. I doubt I will fold it often, perhaps not every year. but worth providing the option, since it also allows height adjustability.

Angle. Level or canted upwards. Level minimized compression on the sprit. Canted upwards improves control of the tack and reduces sail bouncing in lumpy conditions. I suspect I will tip it up about 1-foot, but it will be adjustable.

What will I need to buy? Embarrassingly little, for a professionally built and equipped sprit nearly identical to that on the Antares 44. Perhaps a few few pad eyes and a few screws, though I may have them. I may have to buy the stainless straps. Kits are available for ~ $1200 + rigging, but I bet I can do this for less than $50, the track being the major expense, using my considerable "might need" pile. I'll keep track. I will get the sprit I want and a few custom features.Not much, lunch money should cover it. Neat.

Thoughts?

rev. 10-12-2015
After a day of measuring, looking at the speed polar, and considering the way I sail, I've decided the sprit is not nearly as versatile and efficient as the bridle:
  • We use the chute with the wind on the quarter, going deep, more often than on the beam. The purpose of the chute is to provide speed when too deep for the genoa.
  • The bridle presents more area to the wind, when shifted to windward, going deep. 
  • The bridle provides better tack control (height and less bobbing in lumpy conditions).
  • The bridle weighs less and creates no drag.
Jibing remains a problem, but how often do we jibe? Not most days, and then perhaps only once. The ability to go deeper gives better VMG and reduces the number of jibes

The current set-up looks like this:


Friday, October 9, 2015

Barber Pole?

Actually, what we are seeing is the more vulnerable blue strands (more sun absorbed?) failing under extream winch loads, while the core hangs tough. The core is Dyneem, still strong as heck even as the cover fades away. Only the cover between the clew and the winch--about 6 feet--is affected, since is the only portion that sees high loads, depending on how much the sail is reefed. This is not chafe, since this section cannot reach the winch or any chafe point.

Why is the load not simply carried by the core? I suspect that it is for the most part, but that the cover is creeping on the core just enough to have caused this odd failure pattern.


Sunday, September 20, 2015

Mooring Knots

This is a new low for me.

Not only is the boat secured only by an overhand stopper stashed behind a dock cleat horn, he messed with the next boats tie-up (the other cleat on the next boat was a proper hitch).


But then I saw something even worse, primarily because it is the boat next to mine. The pity here is that I had tied a proper hitch... but he decide to re-tie the boat.


So when the marina staff won't fix it, and the owner won't fix it, and it is next to you, what do you do to keep your boat safe? I'm betting this boat is uninsured.

And there are more. This one resulted in the boat sinking a few weeks later.

Wednesday, August 19, 2015

Idea Drive

I'm always looking for things to investigate, either product reviews or engineering problems.


A few that are in progress.
  • Bucket dust collector. I made a trap for bottom sanding dust that goes between the sander and the shop vac, keeping the filter clean. Also good for pumping liquids.
  • Tall step disease. How boats have more access issues than they need to.
  • Outland hatch covers. I like them.
  • Gaffers tape. Good stuff, outlasts duck tape years vs weeks. 
  • Mooring. Quantitative testing of the effect of spring lines and such.
  • Catnip oil as fly reppellant.
  • Aluminum and zinc anodes. 1-year test starting soon, brackish and fresh.
  • Spill prevention. A few tools to prevent spills while refueling. So far I really like the shaker siphon.
  • Affect of additives on polishing. Some make filtration easier, some make it worse.
  • Stitched eye and thread UV follow-up. I'm going to break samples after 2-years in the sun.
 A few in the thinking stage.
  •  Boot drier. There are commercial systems and home-built.
  • Aluminum treatments (Alodine1201, zinc chromate, TefGel and more. Salt humidity chamber and old mast sections.
  • New Stiletto 27 review. They are going back into production!
  • Kayak review. Trying to get a line on some inflatables.
  • AC installation.
  • Seafurl bearing maintenance.
  • Climbing mast from a climbers perspective. 
  •  
_____________________ 


Ideas? Questions? I've got too much time on my hands and I need to do something with it.


Saturday, August 15, 2015

Product Review--Mantus Bottle Opener

As you know, I write serious product reviews. When I read this on SailNet.com I was devastated that I didn't think of it first:

-----

(from SailNet.com)

Mantus Review

The other day I received some equipment from the guys at Mantus. Note, I have no affiliation. I do have one of their anchors, yes, but this review isn't about their anchor. There are enough threads out there on them. I'm talking about the Mantus bottle opener. It was actually free for a clever begging campaign, so any negative comment on my part is rude, however, there are no perfect tools for boaters; the opener has its faults. The product came well packaged and in a timely fashion for an overseas delivery. After unwrapping the package, I could easily see that it's a beautiful design and fitted well in my hand. Storage would not be complicated which is an asset for any boat owner. It also had a clever loop for a chain to possibly be used as a cool bling bling necklace, but I digress. It worked very well for the first 6 beers or so, but as the evening's enjoyable extensive testing progressed, and interesting attempts to keep notes for this review proceeded, it became increasingly difficult to operate; however, not insurmountable, they were enough however to give me a powerful headache in the morning because I couldn't totally figure out the problem. For some reason, it kept slipping off the bottle tops and wouldn't properly set. After 4 or 5 more beers (I think) it became useless to operate so I went to bed. The tests were inconclusive (actually I misplaced my notes), so it looks like I'll have to do further testing to retrace my steps again this evening. For now though, I am impressed overall with the design and would recommend it to fellow Sailnet members. Thank you Mantus. 

-----

I'm too old for this particular type of testing, so I'm thankful that younger sailors are willing to step up. I'm not sure the above tester is qualified however; I can't recall any opener failing me at any point, but perhaps I was very determined... or perhaps I just can't recall.


Tuesday, August 11, 2015

Tying-up

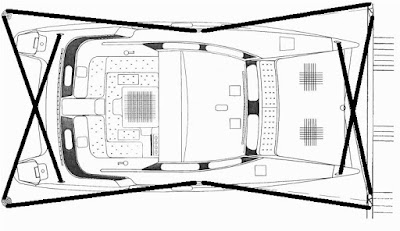
As I begin work on a mooring project (related to anchoring--it seems easier to the sailor, maybe, but it's longer term and the boat is unsupervised), I consider what is work teaching. It's easy to point at bad knots--and I will do that--but serious failings are often more subtle. Take these owner's manual drawings for the PDQ 32:

Note: I have BOLDED the lines in each case to draw the eye to the triangular patterns. Perhaps it makes it easier to visualize the load sharing.

Between Pilings. Very conventional, but still there are obvious failings. All of the lines should be nylon, roughly the same size. Some authorities suggest that the springs can be lighter, based I suppose on the fact that the bow-wind and stern-wind loads are lighter. However, in the event of a breast line failure, you'll wish they were full strength.
  1. The bows are too close to the dock. There will certainly be slack, to allow for tide and wakes, and this boat will hit.
  2. The slip is too small. I'll assume this was illustrator license, but clearly the stern piling are a problem.
  3. The bow line and stern line angles are too perpendicular tot he boat. They would take some strain off the springs if the angle were less. Additionally, the boat would be safer if any one line broke.
  4. Where does the dingy go (the lines are going right through it)? The answer on the PDQ is to add deflectors down low, inside the stern, to run the lines under the dingy.
There are also many positives. A lot of redundancy, more than seems obvious.
  1. Greatly reduced motion and loads. I'm waiting on windy weather to take load readings both with and without the springs.
  2. If any one lines break, the boat is still well controlled, depending on slack.
  3. With any 2 lines broken, even next to each other, the boat will not hit anything, if the slip is properly sized. I've tested this both with models and full scale.
  4. With any three lines broken it may rub on one piing, but will not go far enough into the next slip to strike another boat. With good rub rails, you are probably OK. 


Alongside. Also conventional, with some of the same failings.
  1.  Where does the dingy go? Same solution.
  2. No fender boards. While not needed on floating docks, they are mandatory if tied beside pilings. 
  3. Bow an stern line angles should be greater, in case the spring fails.
  4. I believe the springs (alongside only) should be polyester. There is no need to absorb shock and the main purpose of the spring is to keep the boat positioned properly for the fenders to match pilings. Even with fender boards, sliding fore and aft is asking for trouble. As it is, the boat will still move fore-aft a foot or two with the tide, since the spring will describe an arc of a circle, where the radius is the half length. 


The bad thing is that a single failure will move the boat enough to pop a fender out. What Would I do for storms?
  1. 2 fender boards. for pilings, lots of fenders for floating docks.
  2. Additional springs. Either from the bow and stern forward and aft, or if length does not permit, from the mid-point of the dock to the bow and stern cleats.
  3. Additional breast lines But I would not change the angle much; An angles breast line increases the pressure on the fenders in an end wind.


But mostly, this is a good plan. There are no short lines, so shock and tide are attenuated. No single failure is fatal (assuming the slip is a little bigger).

----

This advise from West Marine, is just lame:


  • The power boat should have springs to both sides.
  • The stern lines should be crossed
  • The Sailboat should NOT have a spring line anchored to the chain plate or the winch!
  • The breast lines should be perbendicular to the dock (less leverage on the fenders.
In other words, not much is right. I sure hope it is a floating dock, but even so....

Sunday, August 9, 2015

Check Your Gear

This is climbing gear, failed years ago, but the message applies to sailors. I have cracked toggles, cables, and shackles. These sit on a book shelf, across from my favorite chair, as visual reminders.

Fatigue. In this case it seems clear that the latch pin was fitted a bit too tight, and after some years, started a crack. since the strength of a carabiner is dependent upon gate integrity, this one was retired, certainly only a fraction of it's rated strength.


Open gate strength. This biner snapped during a fall when the gate was pressed open by a bump on the rocks; with the gate open biners loose 50-80% of their rated strength, depending on the design and how they are loaded. Fortunately there was a back-up and there was no serious consequence, just a clear lesson; the gate MUST be protected from even light contact.

Saturday, August 8, 2015

Wind, Fetch, Height, and Period

A steady swell is a rare thing for most sailors. We spend most of our time in confused seas, the result of variable winds, diffraction affects from shorelines and bottoms, tidal currents, and wakes. Still, when working through the anchor testing series it was sometimes necessary to predict what I would find at a certain place and time, so I could be there and test what I wanted, when I wanted.


For example, a steady 40-knot squall lasting 30 minutes (fetch is the distance waves could have traveled during the squall, or about 4 miles) will generate steep waves of about 3 feet with a period of about 1.7 seconds. Those same waves generated by a 15 knot wind over a long time would have a period of 6.5 seconds and would be far more pleasant, and 40 knot winds given a long blow will generate mountainous waves I hope never to see; the largest I've sailed in were about 10 feet, and that was enough. I think I could go the rest of my life without winds over 20 knots.

Saturday, August 1, 2015

A Poor Solution to Non-Problem

For most of us with all-chain, simply getting the chain straight between the anchor and the gypsy will keep the anchor coming up straight, perhaps with an occasional un-twist (lower and re-hoist) if we have spun. Some like swivels. But then there are bad solutions:

While this gem is only offered up to 22-pound anchors, the leverage  in a side pull, should the anchor get stuck, seems pretty rough on the bolt at the anchor end. Worse, it adds 6 inches more length to the anchor shank, increasing the odds of bending or breaking out.

Raspberry Award.

Saturday, July 18, 2015

More Jacklines

Vertical Jacklines

Who says they all need to be on the deck? I installed a pair of vertical lines to deflect the genoa sheets away from the mast-mounted halyard winches (one on each side), around which they loved to foul during tacks. They are anchored to strong points and the line is 1/4-inch Dyneema, selected because I had it and it was non-stretch. At first I was concerned that the deflectors would be in the way, but I soon realized that they were handy holds and clipping points when working at the mast, much better than clipping to the mast base. I can even lean on the tether in rough weather, allowing for better 2-hand work.


Jacklines and Lifelines as Hand-Holds

It is often said that using the lifelines as handholds is a bad habit. While there is truth to this on a monohull (the leverage on the stanchion bases is cruel when hauling to one side from the deck of a leaner), I disagree for catamarans. The difference is that cats do not heel and that most of the motion is vertical. In heavy going cats pitch, and sailors near the bow can be nearly weightless. Additionally, my jacklines are relatively high at the beam, since they are secured to the hard top. Thus, the safest way to traverse the side decks between the hard top and the tramp is to hold the lifeline in one hand, the jackline in the other, and pull up. Not to the side, not push down, but pull straight up such that your feet are held firmly on the deck. There is little bending stress on the stanchions because the load is vertical, and the support is steady rather than surging roughly as the boat moves. Intuitive to a lifelong climber, something may lubbers and sailors have to be shown.

Pulling up (not to the side!) on lifelines may be a little hard on them, but it is easier on me. Not a mistake, but a well-reasoned standard practice.


Probably just a catamaran thing.

Friday, July 17, 2015

Ducklings always Follow Their Mothers

I guess it is a universal rule.


Cay of Sea and tender, Unnamed cove

The Chesapeake Bay is a small world sometimes. This week we ran into friends we had met over the internet, who dock only a few hundred yards away in Deale, but had never met, face to face. Good stuff.

Tuesday, July 7, 2015

Chafe

Rev. 10-13-2015.

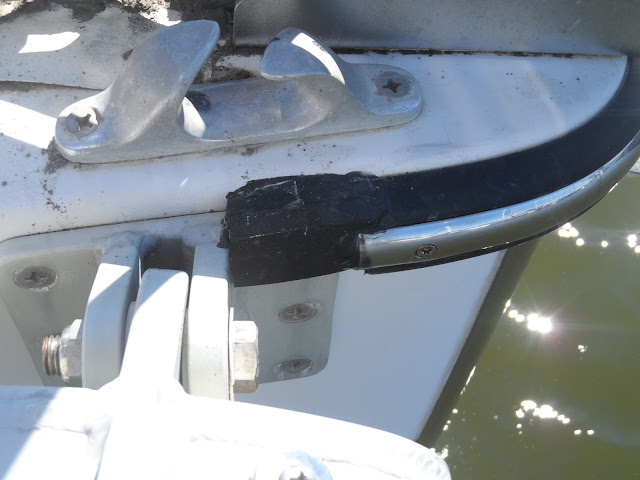
While I am nearly always complimentary of the PDQ and the attention to detail of the designers, everyone makes mistakes. But in this case I can't imagine what they were thinking. It is not just a yard fitting error, since the starboard bow is identical. It's a design error.

For the record, it never did damage either the webbing chafe guard or the line,since the webbing stay stationary relative to the edge, and the rope glides inside. But I still did not like the look of it. A really strong wind could change things. But it does make a strong statement about the benefits of free-floating chafe gear.

With heavy docklines and my normal heavier bridle this little slot between the rub rail and the deck is too small to be accessible and in 6 years has never cause a problem. However, as I started experimenting with lighter bridles for a Practical Sailor article on mooring loads, I found the thinner 8 mm line could slide right into the slot and that the slot is quite sharp, able to slice a line in minutes to hours, depending on the load.


The chafe gear does a fair job of keeping it out of the slot, but I would rather eliminate the slot. My first thought is to fit a block of something into the space, matching the rubber and secured with a screw and 3M 5200. I'd rather not obscure the forward beam bolts.


Rev. 10-13-2015.
While not the prettiest fix--I may trim this to make it purty--this does solve the problem. I cut a rectangle of 3/8" thick mud flap, laminated it to 3/4" thick, and trimmed it to fit the space. I then glued it in with Loctite PL S30. This sealant has virtually the same properties as 3M 5200, with slightly better elasticity. It is also available in white as Loctite PL S40, the only difference being color.

Saturday, July 4, 2015

More Active Anode = More Growth?

I read this in a guidance document by maker of lower potential anode material, and I admit it didn't make obvious sense. Then I started soaking a few trial anode/pipe combinations to help develop a test method for an up-coming anode review.


By December it became clear that unprotected copper fouled less, no doubt the result of more free copper near the surface.

Clearly the more active anode has more growth (aluminum on left, zinc on right, same brand).

Why?