Pages
- Home
- Introduction to Sail Delmarva
- Site Map
- Anti-Chafe Gear
- Marine Winterizing Primer
- Man-Overboard Recovery and Climbing Gear
- Holding Tank Odors vs. Carbon Vent Filters
- My Other Blog (Chesapeake Gunkholing and Kayaks)
- The Purpose of Work
- Diesel and Biocides
- Practical Sailor Magazine
- Good Old Boat Magazine
- The Bookstore
Tuesday, July 2, 2019
A Few Boat Specific Notes for My Sailing Partners
The mounting plate is the aluminum strip at the bottom. It is attached to the two big clamps. The two angled slots are to clear the reverse lock.
I also replaced the fuel line assembly with the bulb. It has been getting stiff and not pumping up well.
The motor did die on me once, when I dialed up full throttle for a few minutes to check the mount. I noticed the bulb was sucked flat, suggesting the anti-siphon valve on the tank probably has some dirt in it. When I pumped it up the engine start with an easy pull and ran fine at moderate throttle. I'll take it apart soon.
I then upgraded the shroud tensioner to 8:1 from the previous 4:1. It should now be easy to tension the shrouds in strong winds without leaving the cockpit. They are also easier to release. It was line I had, perfect fit, no leftovers.
It is possible to over tension the rig now, if you get ham-handed. According to the manual, the max tension is about 1600 pounds, which means about 300 pounds on the tensioner. That means do NOT pull more than 300/8 = 37.5 pounds on the rope. A good one arm pull, but no more. It is very smooth.
In the photo you can see a black whipping ~ 5 inches from the cam cleat. This is the light wind setting. At a minimum, pull both adjusters to this position before sailing. This should cover you up to about 6-8 knots. As the wind increases, you need enough tension to keep the lee shroud from going slack and snatching tight; that is very bad for it. I will put two seizings close together at the maximum setting, but it was not windy enough to establish that value today. It's probably about another 9-12 inches up, but we'll see. For now, just enough to take the slack out.
And then I went kayaking. This is just south of the beach near Deale.
Monday, June 17, 2019
Painting a Sail
Rev. 7-25-2024
I used this painted sail for three years before replacing it for other reasons. The paint never pealed.
No comic book super heroes or advertising logos. Just the UV strip.
Our new-to-us laminate jib is starting to fail along the edge of the sun cover; the cover makes a stiff spot and the flexing is damaging. The cover was also too small and is itself, failing (UV Insignia cloth). If I tried to sew on a new cover the needles holes would destroy the sail, and it's too old to justify the expense and effort, really.
If the ONLY thing we want to due is block the sun, why not paint? For the past year I have had samples of many different paints, ranging from house paint to specialized sail paints on racks on the roof, weathering. Naturally enough, it is a writing project.
Although the roof top exposure tests are not complete, I selected MDR's Inflatable Boat Topcoating. It seemed to be among the top performers, I've used it on inflatables, it got a top rating from Practical Sailor some years ago, and I had enough left over. Free is always nice.
No, I don't expect it to last as long as a Sunbrella cover. Neither will the rest of the sail. But it also cost me only 15 minutes work and $15 worth of leftover paint.
Look for a detailed report and follow-up in Practical Sailor Magazine.
Saturday, June 1, 2019
Cruising Small, Cruising Fast
I started started sailing on a beach catamaran. I heartily recommend learning on a small boat, because they teach a sense of the wind and waves that is hard to gain on larger boats. But if you want to go farther or spend the night, you really need something with a bunk. But you don't need 50 feet of shiny fiberglass and the mortgage and slip fees that go with it. That's what they sell in the mags because that's where the (your) money is.
And to be honest, big boats aren't that much fun to sail, not after you get the hang of it. They're more about learning the systems and planning than actually sailing. Would you you rather go for a bike ride or drive a Winnebago around town? Personally, I'd take the bike, and that is why I downsized from a cruising cat to a 24-foot trimaran; the smaller boat sails better and I feel the wind again. I missed that on the cruising cat.
The thought that brought fire to my pen is that too many sailors feel that sporty boats are for racing. Poppycock. They are for whatever is fun, and if you only take the plunge, you'll see that fast cruising is a blast, though it can be a bit more like camping that staying in a hotel. Of course you can do both; sail fast from point A to point B, and then stay in a motel.
And that is the sort of thinking that goes into cruising fast and small. Ignore the magazines and make it work. You've never had so much fun!
Friday, May 31, 2019
Shroud Tensioner
rev. 7-25-2024
This probably won't interest most readers, but a fellow F-24 owner wanted some images.
Because the F-24 folds, a quick release of cap shroud tension is required. Pulling the shrouds aft with a tackle is a simple way. This can either be a cascade:
I have since re-rigged this as 8:1 and the tail slack is pulled under the tramp with a bungee (out from under foot and can't wash off the deck). The only reason to rig it 4:1 is so a gorilla can't over tension at the dock. With 8:1 you can tension under full sailing load and get it right.
Tuesday, May 28, 2019
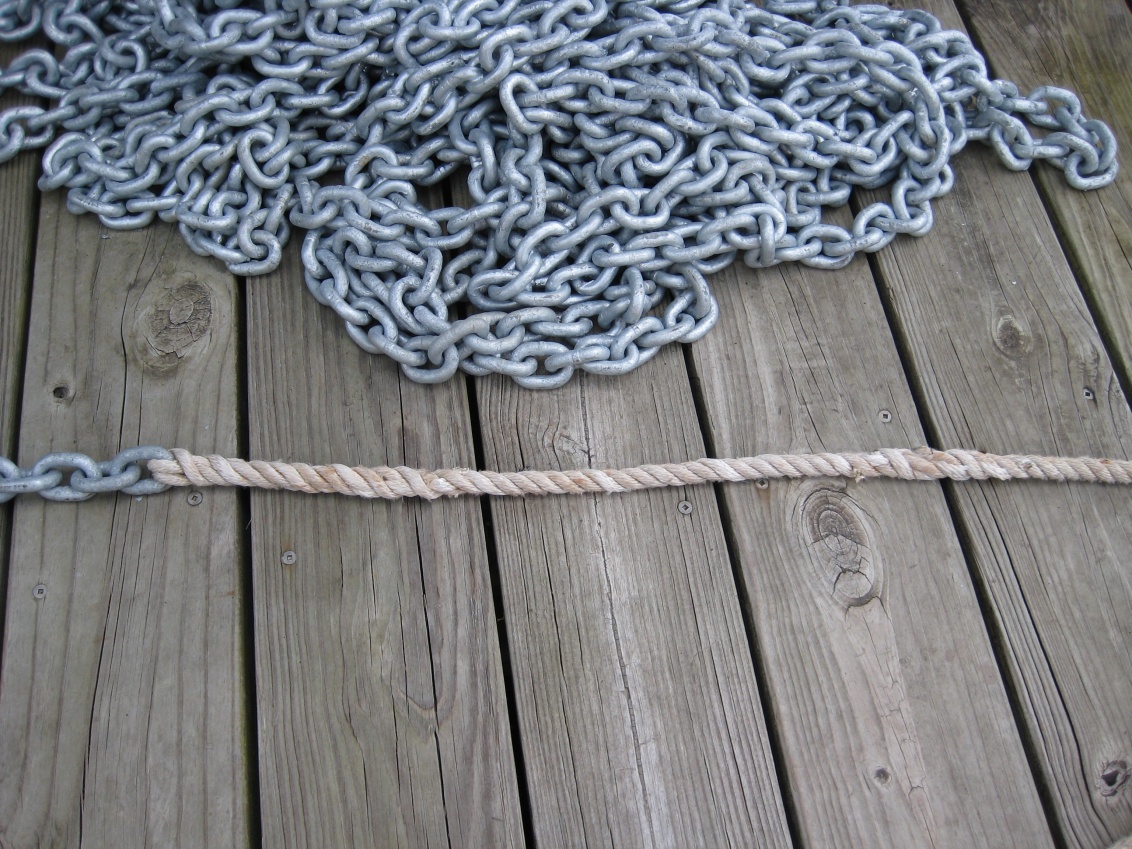
The Best Rope-to Chain Splice
Joining chain to rope in a manner that allows it to feed smoothly has always been something of a challenge. Back in the day of weak chain and hemp rope, a 2-strand splice was developed to allow bulky rope to fit through a link. One strand was unlaid way back and the remaining strands go through the link in opposite directions, laying flat and sharing the load evenly. Even with the loss in strength around the link, 4 strands were as strong as the 3 strands of the rope. One of the strands would be laid back in the empty groove and terminated in the manner of a long splice, and the other back tucked like a 3-strand eye splice.
Then ropes got smaller and stronger, and a simple 3-strand back splice or crown splice became the standard. The smaller line was as strong as BBB chain. Then we introduced G43 and G70 high tensile chain. By the time we use a rope as strong as the chain, the splice was too big for the windlass gypsy, and so the irony is we find ourselves returning to 19th century splicing technology.
It is a little more difficult to get the strains even, and the spice takes a few minutes longer, but you gonna love the way your windlass feeds. No more jams!
The name "irony splice" was coined by Brian Toss, and this method is well described in his highly-recommended book, The Rigger's Apprentice. It takes considerable practice to get the tension just right, but if you have any ability with splices, by the third or fourth try you should be in good shape.
The following instructions are for half-inch three strand rope. For larger diameters, increase the spacings proportionately.
- Place a light seizing around the rope about 5 feet from the end.
- Tape each strand separately and securely.
- Unlay one strand back to the seizing, without disturbing the other two strands.
- Place a light seizing across the two remaining strands about 3 feet from the end.
- Untwist the two strands and lead them through the last link of chain in opposite directions.
- Take one of the strands and lay it into the space left vacant by the first strand that was unlaid. Be careful to maintain twist in that strand, and to choose the strand most naturally lies in that vacant space.
- When this strand meets the first seizing and the first strand that was unlaid, join the two strands in the manner of a long splice. This will require a locking overhand knot, back tucking both strands, and tapering.
- Take the remaining loose strand, still hanging loose at the last link of chain, and tuck it back at least eight times in the manner of a back splice. Taper carefully.
Thursday, May 16, 2019
Backing Plate Testing
Starboard showed micro cracks after 3 week. It also creeps a lot--I had to keep re-torquing for 48 hours.
- 1/8" aluminum for light duty in dry locations. Thickness = 1/3 bolt diameter minimum.
- 1/4" FRP most places, bonded if there is high load. Thickness = 2/3 bolt diameter minimum.
- 4 layers of 17 ounce biaxial cloth for every 1/4-inch of bolt diameter, where there is high load and irregular surfaces.
- Diameter of plate = 5 bolt diameters minimum.
Monday, April 15, 2019
In praise of WAG Bags
WAG (Waste Alleviation and Gel) bags are widely used by the military and FEMA in situations where conventional sanitation practices aren't practical. For example, I used antifreeze in the toilet of my PDQ in the winter, and that worked well, but carrying a portable toilet on an icy dock from my F-24 seemed pointlessly dangerous. So I investigated WAG bags as a winter alternative.
- Light.
- No head to clean.
- No odor once off the boat.
- No pump-out station, no lugging the portable head home to clean and refill.
But even when cruising, I would have kept a box onboard for emergencies, had I known of them. They can be laid right in the head (drain and clean first, obviously) or used over a bucket, no mess.
Not pretty, but darn functional.
Friday, April 12, 2019
Why Not Webbing?
Webbing is perhaps the most traditional method of attaching sail slugs to the mainsail. Wrap 2-3 times and sew.
So what about other applications?
- Lifeline lashings.
- Sewn to the jib or reacher sheets at the end, there is nothing to hang up on.
- Slab reefing outhaul tackles. Less friction through the clew ring.
- Furler line. I use webbing on the reacher--I can fit more on the drum that way. The webbing is spliced to a larger rope tail.
- Control lines that are underfoot on deck.
Ideas?
Wednesday, April 10, 2019
PDQ 32 and 36 Rudder Core

Tuesday, April 2, 2019
Anchor Lights Get Smaller
They came from a cottage industry, some nearly works of art and others crude affairs. Some nav lights were the wrong colors. They didn't always shine through the correct angle. Some interfered with VHF, a particular problem with anchor lights, being located right next to the antenna. None were USCG approved.
I'm keeping the old one on my bookshelf, like a little lighthouse. But I'm happier the Tecniq is at the masthead.